Welcome to my blog. Let what you see stimulate your imagination and inspire your own creations.
Showing posts with label wood bowls. Show all posts

Thursday, September 28, 2017

A different kind of rim

I'm always looking for ways to keep scrolled bowls fresh, and decided to play around with the top rim.  I've seem versions around that did this, but none that involved contouring by sanding.

The principle is pretty simple.  The ring is sized extra wide, and the outside cut is made vertically, rather than at an angle.  Some people leave the extra wood plain, others use fretwork.  I decided to round it to create a soft look, and found it quite attractive.  My own preference if for softened or rounded edges, which I think gives a more finished appearance than knife sharp ones.

This bowl had curved sides which made the designing a little tricky, and the sequence was different since you can't work as well once the top ring is attached, but everything else was standard, and I'm going to see how far I can take this before I run out of ideas.


Thursday, December 12, 2013

Yarn bowl experiment

I had never heard of a yarn bowl until I attended a recent crafts fair and saw one made of ceramic.

It's a bowl meant to hold a ball of yarn and keep it from rolling about while you're knitting.  I located lots of pictures online, and created three prototypes.  Since I wasn't sure if they would really work, I brought them to a local yarn shop today and asked if their knitters could test them out and give me feedback.

I'm eager to see what they can tell me, and what suggestions they have.  Once I know what changes, if any, I need to make, I can work on plans for one to submit for publication.  I'll post pictures of my prototypes when I get them back, along with the feedback I received.

If something is going out under my name, it had better deliver what it promises!

Wednesday, December 4, 2013

New use for bowl cutoffs

I try to limit the number of cutoffs that I keep, and usually can stay on top of things so that my wood storage remains manageable. However, Joe always goes through my trash bin before he empties it, and a lot of my discards end up in his section of the shop.

Take a careful look at the shelf supports, and you'll recognize the pair as half the wood left over after making the first cut of a bowl.  Gotta admit that it's pretty clever, but now I'll never be able to get rid of anything!


Wednesday, February 27, 2013

Mini round inflatable in action!

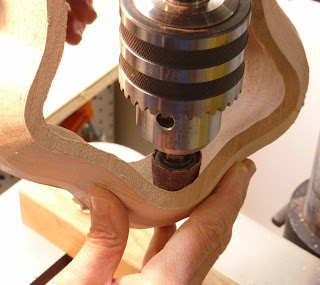
I finally had a chance to try out the new mini round inflatable, the latest in King Arthur's Tools  Guinevere line-up.  It looked so tiny chucked into the drill press, but worked just fine.  I had a little trouble inflating it, until I realized that I needed to tighten the nut on top with a wrench, not just with my fingers.


I had one specific use in mind--to sand the inside of a tight curve without sanding wood off the gluing edge.  Since the new project I'm working on curves inward, I sanded the rings in stages for easier access.  This left gluing edges susceptible to damage, and demanded real care.  I'm pleased to say that the mini came through with flying colors.  I have some other uses in mind, but those will just have to wait their turn.  It's fairly pricey for such a small sander, but the curved lower edge makes it unique, and invaluable.


Sunday, November 18, 2012

Using common veneer to create interest

It's amazing how small changes can make a big difference in the appearance of a project. I was impressed, early on, at the elegance of many lathe-turned segmented bowls, and discovered that veneer was often used to set off the different elements. I found that veneer could be used in the same manner with scrolled bowls or boxes that used a straight-sided ring between the upper and lower sets of angle-cut rings.

This box used three layers of veneer on either side of the maple burl center ring. The veneer was glued to the blank, clamped securely until completely dry, then cut. Veneer from common wood is not very expensive when bought in bulk, and all you need is an assortment of light and dark colors to achieve an effect that moves your project to the next level.


Sunday, July 3, 2011

Swag bowl tutorial

I'm nearly finished with a fairly complex swag bowl--just needs one more coat of finish. Rather than post just the completed project, I decided to post pictures of its earlier stages as well, so you can see how rough the bowl looked before sanding and finishing.

The pattern for the blank was based loosely on one used for a really high-end lathe-turned bowl. The glue-up was sanded with a drum sander, then finished on the SandFlee to get it really smooth and even. The main wood was ipé, the strips padauk, and the end pieces yellowheart.


The blank was then cut into four rings, at a 20˚ angle. The base was re-cut to a 35˚ angle for ease in shaping. The rings are stacked to illustrate how they look assembled, but are actually glued up one at a time.


To stack the rings so that the swags will line up properly, you must anticipate how they will meet once sanded.


Once the rings are glued together, the inside is sanded smooth, and the base is glued on.


Then, the outside is shaped and sanded, and the upper rim is given its final shaping.


I then applied several coats of Waterlox to finish the bowl. I usually use a combination of spray shellac and lacquer, which works quickly and easily, but decided to give this a try. Although the wood does look nice, I have conflicting sets of instructions on the best way to apply it, and will need more experience before I make a final decision about it. I still have one final coat to give it before letting it cure and giving it a nice rub out.


Sunday, April 17, 2011

Wish I had room for one of these


Despite our best efforts at maximizing space, we simply can't find room for a drum sander in our garage, even one slightly smaller than this one. It's the one tool for which I still use the community woodshop, and hope that no one has just tried to sand off paint, or used resinous wood and ruined the sandpaper. I use the drum sander primarily to level glued up blanks made from various types of colorful wood--it's the best way I've found so far to get a smooth blank that is evenly thick.

However, I have discovered that even though the blank appears flat, it usually needs further work, and that's where I use the SandFlee. The flatter the blank, especially for bowls, the easier it is to glue up the rings without spaces. I also use the SandFlee as a jointer to get my strips ready to glue up. Next step is to get a flex shaft extension for the SandFlee so I can sand places that I can't reach using the drill press. And that will be my Mother's Day present. Not as pretty as flowers, but a lot more useful.

Sunday, April 3, 2011

Keeping in touch

Just a reminder that if you have any questions about making bowls, please feel free to email me, with or without pictures, and I'll do my best to help.

And, if you're especially proud of a project, send pictures and I'll be happy to post them here (with your name or anonymously) so others can admire your work.

And now that the weather's warming up, I should be able to make some new videos on hints and techniques that I think you'll find helpful.

Sunday, March 27, 2011

The new swag bowl


As promised, here are pictures of the new swag bowl. The matches are not completely perfect, but they are a lot better than I've been able to do in the past. I used the technique demonstrated in my swag video, and find that it consistently works well.

The one addition to the technique that I'd suggest is that if it's hard to see the ends of the swags clearly for gluing up the rings, try sanding one of the rings just a bit to get a better look at what you have. If the rings have been cut properly, there will be enough extra wood to allow you to do that without jeopardizing the glue-up. And just to play it safe, consider gluing up just one ring at a time.


Sunday, March 20, 2011

A Woodworker and Teacher

I was pleased to locate the reviewer of my bowl book on Amazon, who described how he used the book to teach retired folks to make bowls with the scroll saw. His name is Bob Taylor, and he is a retired carpenter, whose interest in doing trim work helped him develop the patience needed for scroll saw work.

During his winters in the Rio Grande Valley, he runs a weekly bowl class, charging only for the wood. I was impressed with his sensitivity to people’s feelings, and to their desire not to look foolish. Bob even uses “mistakes” in his own work as teaching opportunities. He distinguishes between those students with “passion in their heart”, who have the patience to do the best job they can, and those who just want to find shortcuts.

I’m pleased that my book was clear enough to be helpful to people like Bob, who reflect the dedication, sensitivity, and decency that I find in so many people in the scrolling community.

Wednesday, March 16, 2011

Jury still out on the SandFlee, and a new sanding tip

I finally have the SandFlee operating properly, although it took a 1/16" shim under one of the hinges to get the table level by the drum. I've installed the fence, which was an easy job. I haven't yet used it as a jointer, which is one reason why I bought it, but a preliminary test on a ragged edge looked promising. I need to plan out an interesting glue-up to give it a "field test".

However, I have been disappointed using it to flatten rings. I assumed that passing it over the roller would automatically remove any irregularities. What I seem to be finding instead is that when a ring is cut at an angle, forces may be released that prevent the ring from lying completely flat. This doesn't always happen, but has happened frequently enough to be an issue to contend with. When this happens, just sanding the gluing surface evenly, whether with the SandFlee or sandpaper glued to a flat tile, does not change things. The spaces are generally small, 1/32" or less.

What does work is selective sanding with the sandpaper glued to a tile. I look carefully at where there are spaces. You can use a flashlight or bulb, or strip of paper, to confirm. I then sand the surrounding areas that are too high by exerting unequal pressure on those spots, or if it's a corner, by just sanding that corner slightly. Then I check, and repeat the process as often as needed. The payoff is that you will not get a visible glueline between the rings. Sometimes there is enough flex in the ring for it to flatten out with pressure from the bowl press during glue-up, so it often becomes a judgment call.

The situation to avoid is a space that will not close when you exert pressure. That will result in a product that you won't be proud of. Take a break when you've "had it", then come back later. You'll be happier that you did!

Tuesday, February 22, 2011

A useful program for making patterns

I've usually used very low-tech methods for making my patterns--ruler, compass, cookie cutters, graph paper, etc. While that usually is sufficient, it's not the easiest way to make a pattern for a bowl or stacked ring box.

I've recently started using a program called PolyDraw, created by Dave von Ess, available on the scrollmania.com website, which lets you create rings of various shapes and widths pretty easily. There's a tutorial to walk you through creating basic shapes--round, oval, rounded square, ripple--and once you've gotten the hang of it, you can play with various configurations. Patterns can be saved either as files that load right into the program, or as pdf's once you've drawn them.

I used the program for the outline of the 7-lobed box, and was pleased with how much easier it was than trying to draw a shape like this freehand. Dave is very helpful if you run into problems, and there's an email provided for this purpose.

Monday, December 20, 2010

Model number for the elusive pad sander

I've received many requests for the model number of the pad sander that I use for shaping and sanding bowls, especially those with curved sides. I recommend buying from Klingspor, since they seem to have the best prices, and their customer service is excellent.

The basic tool is the 2" hook & loop pad, FP50200. Add some 10 packs of 2" scalloped discs. in various grits such as 80, 120, 180, 220, 320, and you're good to go. The scallops generally protect against gouging, but if they get in the way for a particular job, just cut them off.

Saturday, October 16, 2010

Preparing for class

I'll be teaching an all-day bowl-making class at the Woodcraft store in Norwalk, CT tomorrow. Although I've done demos, this will be the first group I've taught where they will be doing the work, not me. I have no idea whether anyone in the group has tried making bowls, so it's sure to be an interesting experience for all of us. I even washed my shop apron for the occasion!

Tuesday, March 23, 2010

Problems with Patterns

Here's the last part of my series on why instructions are sometimes so difficult to follow successfully. It focuses on something that seemed clear to me, but apparently not to everyone. Hope this helps.

Saturday, February 27, 2010

Layering to create interest


This is a close-up of a project I'm currently working on, which illustrates how to generate interest by layering. The center ring started out as a 20-segment lamination from my book--time consuming but not difficult. I added pieces of 1/8" oak on either side, then added 2 pieces of veneer to each side on top of the oak. This blank was already used for another project; the current project was sized to use the remainder. I still have enough left over for something small, and will probably add another layer of 1/8" wood for a different effect.

Thursday, January 28, 2010

Video on How to Make a Basic Bowl

I've bumped up this post containing a link to the video I made at Fox Chapel to accompany the swirl bowl project appearing in the Holiday, 2009 issue of Scroll Saw Woodworking & Crafts. It provides such good coverage of the steps involved in making a basic bowl that I wanted to be sure that people who have just recently started checking my blog don't miss it.

Saturday, January 23, 2010

Swag tutorial Part III

Here's the final video in this series. I'll post some additional pictures of the bowl when it's completed, along with some work in progress pictures. Please note two things: first, when using a plywood glue-up for a center ring, the ring is cut with the table level. Second, instructions for using a center ring are in Chapter 6, not Chapter 5.

If the video is not available, you can access it through You Tube


Friday, January 22, 2010

Working with Swags Part 2

Here's the second video, covering the alignment phase. Hope this
clarifies matters, but please email or post any questions you may still have.

If this video is not available, use this You Tube link.


Thursday, January 21, 2010

Working with Swags--plain wood and plywood

In response to requests for information about aligning swags and working with plywood, I've made a three-part video tutorial that covers both. Here's Part One. Hope you find it helpful.

If you cannot access this video, use this link to You Tube.