Welcome to my blog. Let what you see stimulate your imagination and inspire your own creations.
Showing posts with label sanding wood bowls. Show all posts

Thursday, June 2, 2011

Sanding sleeve solution--partly successful


When sanding anything with edges, the openings in the sanding sleeves for the round inflatable sander tend to catch and tear. I was able to fix this problem, using blue tape, with the coarsest sleeve, which is closed when new, but the fix did not work with the others. So, I limped along, trying to limit the damages to one set of sleeves. I like the bowl, but it certainly presented a challenge.

Wednesday, April 27, 2011

Another carved bowl


Here's another innovative use of the stacked ring technique, designed by Ron. As the last few posts have shown, bowls made with stacked rings can be varied by the materials used, or by the techniques applied to the basic project.

Wednesday, April 20, 2011

A really nice project from "Tucson Ron"


I just received the first response to my invitation to send photos of your projects, a picture of a very lovely and creative vase made by a scroller/woodcarver from Tucson. I thought that you'd enjoy seeing it, and perhaps be encouraged to share your own work. Here are Ron's comments about his work:

I have just completed a special project that I would like to share with your readers. The wood is African Walnut and the carved section is Bass Wood. I laminated 1-1/2 inches of Basswood to both sides of a 4" wide length of the African Walnut. I made 4 blanks that were each 3/4" thick. 2 were cut for the center section which left the inside areas for the neck and top. 1 was cut for the 3 ring bottom section. 1 was cut for the 4 ring top section. I used your Oval Bowl pattern and set the table at 28 degrees left side down. The ring widths were 3/8 inch each. The finish is semi-gloss Deft Clear Wood Finish.

One of my other hobbies is woodcarving. I have carved many spoons and also like
relief carvings. I carve with a group call the "Western Whittlers" here in Tucson. I have shared several of my bowls with the carvers and two of them have been inspired to also do some bowls.

I have taught 4 individuals one on one and they have all produce a very nice first bowl. Two men that had never before operated a scroll saw and two women that also had never operated a scroll saw but were very accomplished sewers.

After having made about 25 bowls is seems that I have come to favor the rectangular patterns with only 2 rings. I call them dresser trays. They work very nice for holding keys, wallets, and cell phones on the dresser at night.

Wednesday, February 23, 2011

Scroll a Bowl with Woodworker's Journal

I'm pleased to report that an article I wrote for Woodworker's Journal, which appears in the April, 2011 issue, received a nice mention on their website. It can be accessed through this link. If you receive WWJ and decide to try the project, please let me know any questions you have or problems you run into.

It's always gratifying when the versatility of the scroll saw receives the recognition it deserves.

Thursday, February 10, 2011

Gluing-up Tip

I was working on a new project today, with three sets of rings. After I cut the rings, I discovered that each blank had a slight warp in it. I tried out a new approach to saving the wood, and it seems to be working.

First, I selectively sanded parts of each ring to get it to lie as flat as possible, rubbing it against sandpaper attached to a flat surface. Then, instead of gluing up several rings at once, I glued up only two to start, to take advantage of the pressure from the bowl press. I then added one ring at a time, correcting any warping by sanding the ring and the glued-up unit.

I'm not finished yet, but it looks a lot better than I thought it would. My last project ended up as "designer firewood", and I really didn't want it to happen again. I'll post a picture when I'm through, regardless of how it comes out.

Monday, January 31, 2011

Back to woodworking


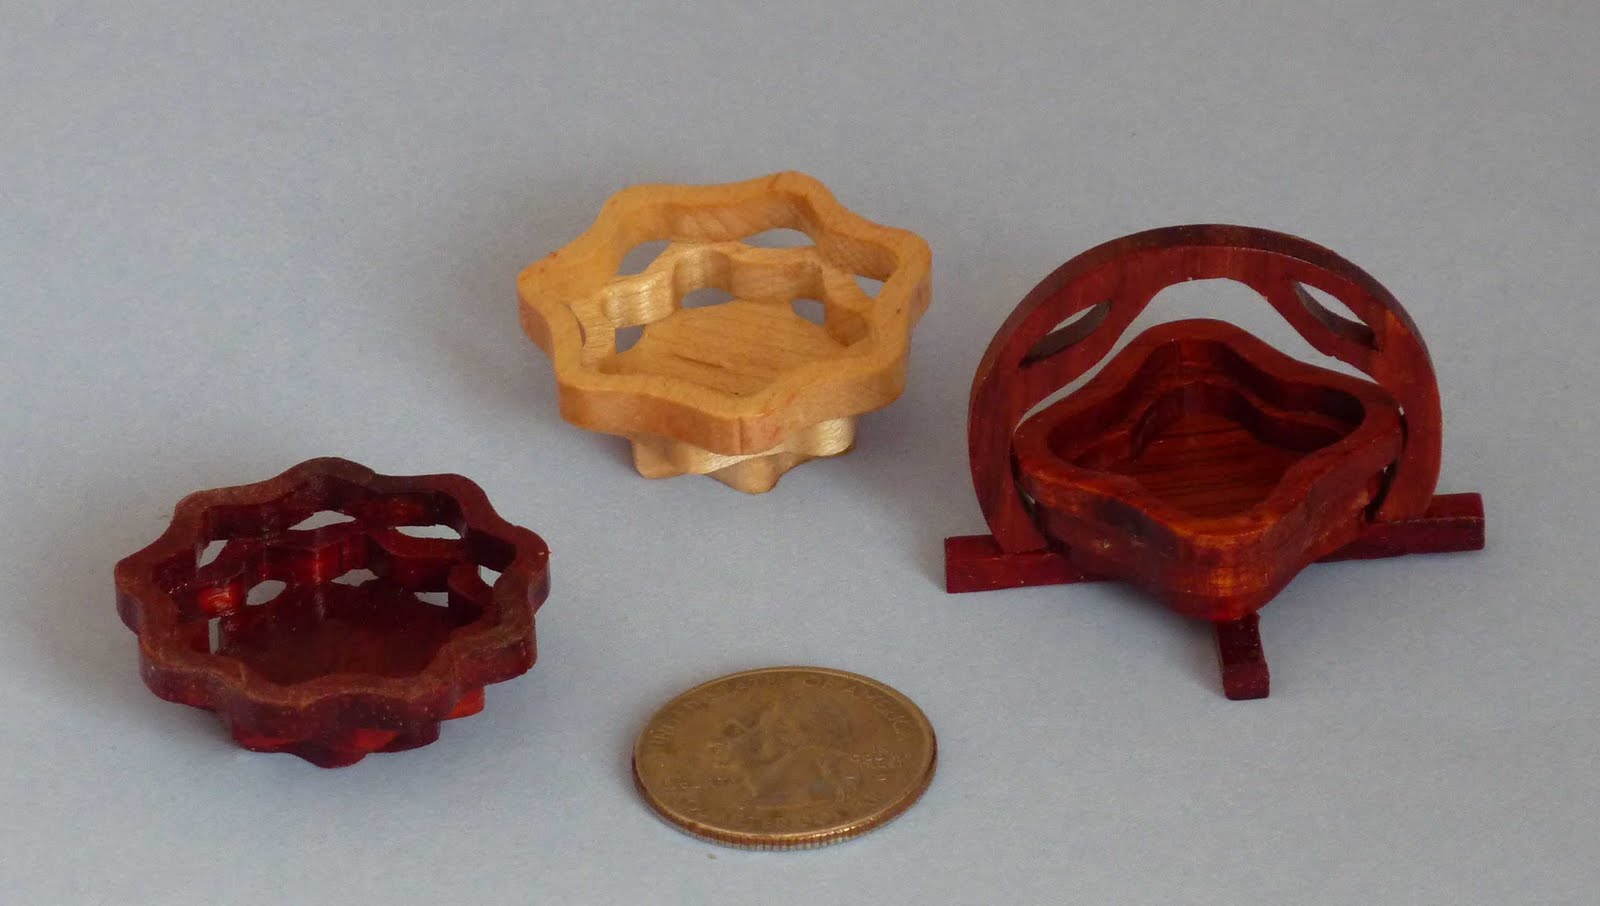
Even though my garage is still too cold to use for long, I have the well-heated community shop, which will do in a pinch. I made up a batch of mini baskets, using adaptations of larger patterns, just to have some fun. They were more time-consuming that they look, but were a nice break from regular stuff. The coin is a quarter. I don't know if I can make them nickel-sized without using the Hegner, but it might be fun to try.

Monday, January 24, 2011

Quick Tip, but you have to be careful

If one of your rings looks really rough--lots of burn, bad blade or drill marks--give it a preliminary sanding before you glue it to the other rings. You have maximum access at this stage, but need to be careful not to take off too much wood, especially from the upper and lower gluing surfaces. And if you use a spindle or belt sander to do the clean-up, be extra careful since they sand so aggressively.

Sunday, January 16, 2011

Those tricky lower edges, revisited with a square shape


One of the most difficult spots to sand is the inside bottom edge of the lowest ring, since once the base is glued on, there's no way to make corrections.

I've posted information on this topic before, but in case you missed it, here's a picture that shows sanding a square, which is even more demanding than a circle. It's sanded the same way as the circle, but you have to be careful not to sand in curves on the straight sides. If you're making your own patterns, be sure to keep the curves at the corners wide enough to accommodate the sander.

Friday, December 31, 2010

A Tip for the New Year


When I start moving from basic bowls to more elaborate projects, I studied segmented bowls, made on the lathe, to get some ideas. What I noticed, consistently, was the use of veneer to set off decorative rings. Although not cheap, veneer is less expensive than thin wood, and can sometimes be obtained in thicknesses as great as 1/16". For the new box book, I experimented with dyed colored veneer, and was very pleased with the results. It works similarly to padauk, or any other wood that can bleed if you're not careful, but otherwise presents no special problems.

Constantines, located in Ft. Lauderdale, FL, is a reliable source for specialty veneer, as well as other interesting stuff. I visited their store last summer, and was impressed with their stock. I was sorely tempted by a beautiful piece of bird's eye maple veneer, dyed a gorgeous blue, but could not think of a way to use it. Of course I'm sorry now to have passed it up. They pack the veneer carefully, so mail order is not a problem.

Since they're a small outfit, they are responsive to special requests, and seem to choose their stock carefully. If you're looking for a way to make your projects stand out, give veneer a try.

Thursday, June 10, 2010

Low tech is often very effective


As I flattened out the side of a strip for a glue-up, I was reminded of how much use I make of this simple sanding device. It consists of a granite tile with a sheet of sandpaper, about 150 grit, glued on with repositionable adhesive. I use it to prepare the faces of bowl rings before gluing them up, and for final "tweaking" of cut surfaces that need to be glue-line flat. When the paper is used up, I just remove the old paper, clean up the granite with mineral spirits, then fasten on a new sheet. If you've never tried doing this, you're in for a pleasant surprise.