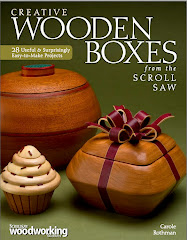
This summer, I was asked by Woodworker's Journal to design a holiday-themed project for their December issue. I decided on a bow box with holiday colors, using red and green dyed veneer for the ribbon lamination.
To my surprise and delight, they decided to feature it on the cover. Since it's unusual for "mainstream" woodworking magazines to feature scrolled projects at all, I was especially pleased to see my box receiving such nice recognition. Great way to start the day!
Monday, October 28, 2013
Sunday, October 20, 2013
Sanding sleeve tip
I've had a hard time distinguishing between the different grit sleeves for the inflatable round sander once they get used. The coarsest and finest are pretty easy to tell apart, but the fine and medium look pretty much alike once I've used them a few times. So, I've started marking them on the inside before the first use, and find that it really helps to tell them apart.
Saturday, October 12, 2013
My new Dremel set-up
I decided that some carving tools would help speed the process of wood removal for shaped bowls. After asking around, I figured that my best bet, for starters, was to get some carbide burrs for my Dremel. I bought three different shapes with 1/8" shanks, dusted off my flex shaft and holder, bought a leather glove to protect the "holding" hand and gave it a try. I also positioned myself by the drill press, where I have a pretty efficient dust collection system, and also could sit at a comfortable height.
The results seemed good enough to order another Dremel (reconditioned, without accessories) so I could have it ready to go without having to change over parts. Here's a picture of my set-up:
If all goes as planned, I should have some interesting projects to post down the road!
The results seemed good enough to order another Dremel (reconditioned, without accessories) so I could have it ready to go without having to change over parts. Here's a picture of my set-up:
If all goes as planned, I should have some interesting projects to post down the road!
Labels:
carbide burrs,
Dremel,
moto-tool,
wood carving
Saturday, October 5, 2013
Too sharp an angle, too little room
Round bowls are very forgiving, but once you move into shapes with tighter curves, you have to be sure that you can sand the lowest ring. After I lost my first blank because of the lopsided pattern, I had to reduce the size of the pattern for the next attempt by 1/2" so it would fit the wood I had. I forgot that the effect on the bottom edge of the lowest ring was likely to be dramatic.
Sure enough, even with my little round inflatable, there was no way I could sand the lower edge into a rounded shape and still have enough wood left to glue on the base. I gave it my best shot, but sometimes you just have to give up. These are views of what the top and bottom of the lower ring looked like, before I realized that it just wouldn't work.
I solved the problem by re-cutting the lower rings at a slightly smaller angle, which gave me more room to maneuver. For the next petal bowl, I'm going back to my full-sized pattern. Should make the sanding a lot simpler!
Sure enough, even with my little round inflatable, there was no way I could sand the lower edge into a rounded shape and still have enough wood left to glue on the base. I gave it my best shot, but sometimes you just have to give up. These are views of what the top and bottom of the lower ring looked like, before I realized that it just wouldn't work.
Friday, October 4, 2013
My new petal bowl
Finally finished the bowl, and it will serve as a prototype for variations that I'd like to try. I'll be covering various aspects of this type of construction over several posts.
This is what the finished bowl looks like. It consists of three separate elements: incurving rings for the lower part and bottom, incurving rings for the upper part, and a flared ring for the outcurving petals.
Here's what the rings look like, and how they stack together. You can see why it's necessary to have all blanks and tops clearly marked to avoid mixing up the rings.


The rings have to be glued in stages in order to sand the insides. The more work that can be done at this stage, the easier it will be to work on it once assembled. Here are some of the parts ready to glue and sand. The only type of sander that can be used is the round inflatable, both larger and smaller sizes. Sometimes it's necessary to use them with a flex shaft if the drill chuck gets in the way.
I'll cover other aspects of the construction in later posts. If you have any specific questions, please feel free to post comments or send an email.
This is what the finished bowl looks like. It consists of three separate elements: incurving rings for the lower part and bottom, incurving rings for the upper part, and a flared ring for the outcurving petals.
Here's what the rings look like, and how they stack together. You can see why it's necessary to have all blanks and tops clearly marked to avoid mixing up the rings.


The rings have to be glued in stages in order to sand the insides. The more work that can be done at this stage, the easier it will be to work on it once assembled. Here are some of the parts ready to glue and sand. The only type of sander that can be used is the round inflatable, both larger and smaller sizes. Sometimes it's necessary to use them with a flex shaft if the drill chuck gets in the way.
I'll cover other aspects of the construction in later posts. If you have any specific questions, please feel free to post comments or send an email.
Wednesday, October 2, 2013
New bowl shape in the works
For the past week, I've been working on a new bowl shape that I've been wanting to try for some time. It's been an exercise in frustration, but I think it's going to work out. First try, I discovered that my pattern was lopsided. Of course I didn't notice this until I had cut a full set of rings. It was not lopsided enough to be interesting--just looked weird! Designer firewood for sure!
Second attempt ended when the first ring for the bottom half of the bowl split just after it was cut. I was using Philippine mahogany, which is very porous, for the prototype, and there was a defect in the wood. I was afraid that even if I glued it together, it would break under the pressure of the bowl press. More designer firewood!
So, I gave it a third attempt. Unfortunately, the only remaining wood I had was not a good match for the top set of rings, but I was desperate. So far, so good, but I've gone through just about every sander I own to get the shape I wanted. I'm now looking into some small power carving tools, since my sanders are not small enough and take too long to remove the wood.
Once the bowl is finished, I'll post it, along with some process pictures. It's been a challenge, but points to some interesting possibilities for scrollers looking for some new ideas to play with.
Labels:
power carvers,
scroll saw,
wooden bowls
Subscribe to:
Posts (Atom)


